The various works and occasional ramblings of one man with no plan and everything that happens along the way. Once upon a time he checked out but like he mafia, he never really left..
Search This Blog
Al builds a Formula One Car. Badly.
After really getting into Netflix's F1: Drive to Survive, I've decided to make
a formula one car. Which as it does in the show, presents its fair share of
problems along the way..
BUT LET'S BE CLEAR HERE
When I say make, I mean along the lines of 3d printing an F1 racer. Not a life
size one either because by the time I get my Creality Ender 3 V2 to print
about half of what was needed for full scale, I will be a very old man and
I'll have completely forgotten what it was I was trying to build here.
So a 3d printed model then, which when everything goes right should be fairly
easy yes? Well it should be but me being me, this cheap printer
being cheap and everything else along the way...well let's just say I've had
my fair share of problems and I'm barely into this build..
Let's start with the obvious one:
THE BUDGET
Okay there are formula one teams out there working on a shoestring budget
compared to the likes of teams like Ferrari and Mercedes with coin and deep
coffers to spare. But that still means a (smallish) pile of millions to play
with for someone like Haas, Williams and Alpha Romeo and that pile is still
miles ahead of my Racing Budget of...uh...zero.
Well okay, not exactly zero per se. I mean there's time involved, electricity
costs plus cost of materials. And when you put that all together you
get...yeah still bugger all.
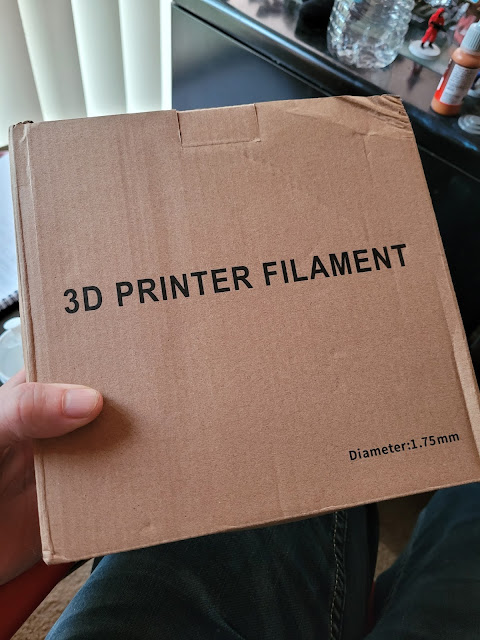
THE MATERIALS
If I had and could print carbon fibre anything, well my Slowbaru would
probably be covered in the stuff. However this is a pretty entry level 3D
printer and not a weaver of the legendary stuff of race cars the universe over
so I'm opting for what I have on hand already which is basic one colour PET
filament.
Not carbon fibre weave, not even close.
And since I'm fulling expecting for this to go wrong on occasion (and it
has) I've opted for the cheap and nasty grey stuff to somehow scrape through (it
was 2 rolls for $30 AUD at the time). It's been hit and miss with more misses
than successful prints but when it does work...well the results are passable.
It's just getting the printer to stop being a clown and printing grey plastic
bits anywhere other than the printing bed itself and somehow in the vague shape
of what I've ordered.
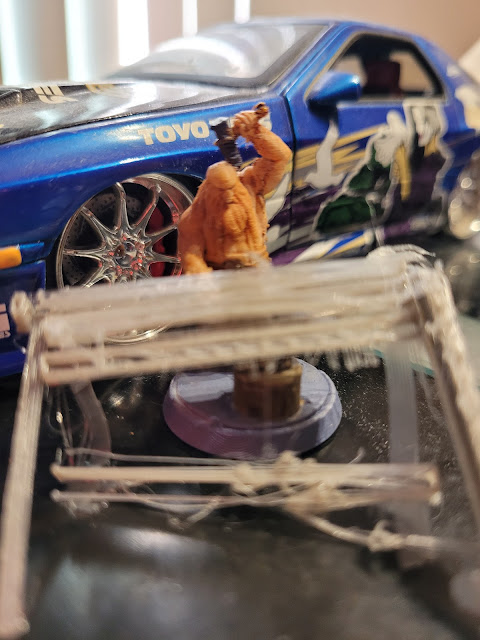
Here's the perfect example as one of my mechanics (Fred the zombie from
Heroquest) examines 7/8ths of a successful nose print and the absolute cluster
bomb that was trying to get the front wing to somehow do anything other than
become a gargantuan pile of scrap filament.
THE PLANS
A team of designers with CAD software to produce lavish plans and parts on
demand? Forget it. I have the internet and budget of near zero which means
it's it's free, then it's an option. And amazingly this model of a 2016 F1
Racer is both that and pretty detailed which means it's the one and only one
I'm working with.
You can check out this design by Maxfaktor
right here. Tell him I sent you but don't show him what I've been up to, me mangling this
great plan might make him cry.
And now that we've got someone else's plan and half an idea of what we're
doing here, let's get on with it shall we?
THE BUILD
(Since this will be an ongoing post as parts are printed and possibly
reprinted more than once due to hilarious failure on all parts, it might be
an idea to bookmark it now. If you're reading this not so fast and furious
action on Google Chrome or Firefox, hit the star at the end of the address
bar. If it's Opera, hit the heart icon. If it's anything else, consult
your IT expert.)
THE NOSE
Of course I'm not working from tip to tail here, that would be logic and that
kind of thinking just doesn't fly here. No I'm starting with the nose section
to get things set up correctly, hitting print and hoping for the best.
Incredibly that 'throw everything at the wall and see what sticks attitude
seems to have paid off because this side of the nose and front axle looks
okay. A bit of cleanup and I think it's come out well.
However as soon as you look on the other side do the problems start to show.
Namely a supreme lack of brakes and wheel support. Where did it go exactly?
Did the printer just get bored and decide not to add it? Well somehow it got
mashed up with and came away in the supports rather easily and so attempting
to bolt a front wheel to this side might be a little problematic when I get to
that point..,
Not to mention how important brakes are to a car such as this. I mean I really
can't imagine someone like Sergio Perez from Red Bull Racing trying out this
printed prototype in qualifying and remarking back to the team via
radio:
Guys, this idea of having one less braking setup is genius! Left turns are
so much quicker now and the car is flying now we're a couple of kilos
lighter!..
We'll just have to cross that mechanical bridge when
we get there.
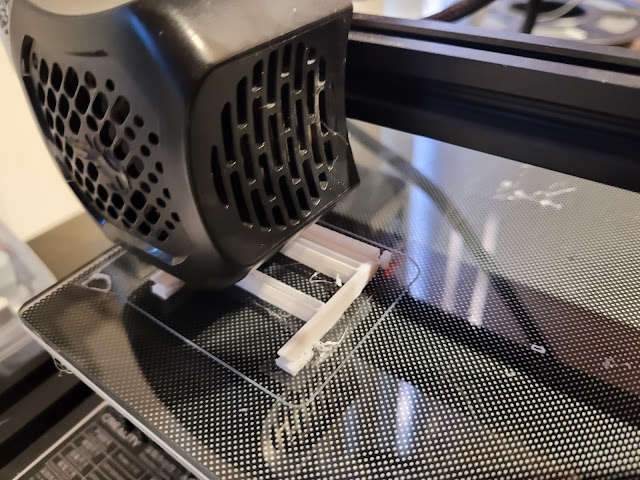
THE FRONT WING
Incredibly, this actually printed without too much of an unrecognisable mess.
Well it finally did after 8 goes, working out where it would and wouldn't
stick to the plate (it has good parts and no go zones). There was quite a lot of
re levelling, checking and rechecking the cheap grey nasty stuff and wondering
why it wasn't coming out and why I'd often find the hot end flying lines through
the air and not actually putting out any filament in the process. However
on attempt number 8 we finally got this:
Even better, removing the supports somehow
didn't snap all of those down force providing fins which was a huge
surprise as I expected them to go flying halfway across the lounge never to be
seen again when I broke out the craft knife. Having possibly used
all my good fortune with this piece, I fully expect the main body to
spontaneously combust when I finally get to printing it.
A little bit of cleanup and things are looking slightly more formula one than
first expected..
Hmm, not bad, it's a start. I wonder if I could get a job making
parts for Renault now? Unfortunately I can't ask former team principal Cyril
Abiteboul because he's no longer there.
And even if I was, the fact that it's taken you this long to do just two
parts of this idiotic build means it would be a flat out no.
Well, it was worth asking.
THE REAR WING
Oh god, what's going on here?
In the usual way of terrible cheap grey PLA, the first two prints of the
rear wing ended up as a complete and utter failure. Both times the printer got
to the point where it flat out decided 'Well okay, I'm bored now, let's stop
printing anything' while still moving through the air for the next forty
minutes. What was left was a flimsy mess that not even team mechanic Nemith
Hardbreaker could do anything with.
Nemeth:
Send it, he says! Well I will, straight to the scrapeap!
Bwahahahahahaha!
After swearing at it a few times wondering why the filament decided to
pull a no show, I wondered if it was the plans for the part or the choice of
grey causing the issues. And so I switched from awful grey to usually reliable
white PLA and wouldn't you know it? Soon enough a working wing started to
appear!
But silly me, I celebrated a mite too early over the fact that this had
worked because next second..
Well how do you suppose that happened?
Look it's not a major problem, I'll just put it back together with a
little superglue and once painted, nobody will even see the fix. I mean I'm
sure this happens all the time in F1, doesn't it Sebastian Vettel?
Mumbles in German
(Maybe I've just blown his mind with this innovative fix?)
The list of prints to part is growing shorter but the pile of scrap is
starting to build..
Skrapit the Gobbo reports he's had one of his busiest months in ages
with this project
But next we tackle the wheels. They're round with no moving parts, how
hard could this be?
REAR WHEELS
Yeah I don't see this printing wheels things working somehow..
According to Christian Horner from Red Bull,
a great pit stop is a sub 2 second one. Thankfully when a car does box and hit the pits, they have many a
spare tire on hand because according to my Ender 3 V2, I can print out just
one wheel for this project...in roughly three and a bit hours. (And that's
even with just 5% infill selected.)
I just can't see that working out for F1 anytime soon though, by the time I
got one quarter of the car finished, the race would have been over hours
ago.
To make things worse, the white filament that saved my bacon come rear wing
time has decided it doesn't want to do any more work and has resorted to
turning itself into flaking powder, making it less like a replica Pirelli
rubber and more like what you'd find in the vending machines in a cheap
laundromat.
But stranger still, dud grey seems to be a-okay with printing tires
(after four failed starts) and my first rear wheel came out with nary a
hiccup.
Boltit the tire tech gives it a go over.
The wheel provided is scarce on detail but I might just hunt around
for a printable rim to slot into that opening when I've got some spare time.
And having done the first correctly (eventually) the second is currently
printing without issues which is a rare joy on this build.
FRONT WHEELS
A little thinner than their rear counterparts to print with 5% infill as
they come to a sniff over 2 hours and 45 minutes just to finish one. While
that hilarious time still doesn't help modern day pit stops at all, it may
have at saved Team Haas from these wheel related dramas back in 2018 by
virtue of no one still watching the race by the time they finally came off
the printing bed.
(I still feel for the entire team watching this happen not once but
twice.)
First one came out after a series of starts but in the usual 'ha ha, you're
expecting the second one to work just as well aren't you?' fashion, it
didn't. I had clogs, I had misprints, I had to try printing on another part
of the bed and while doing that, I also found out if you print it flat
instead of standing it up, you save half an hour of print time.
We got there in the end.
That's the first one printed standing, the second printed flat and one of
the rears for comparison. It's pretty obvious which side is which but I'm
sure there's a rookie pit crew out there who have managed to put them on
back to front..
A TOUCH OF UNDERCOATING
While we work out a plan of attack for the breaking of the body down into
printable chunks, I figured it was high time we stuck a couple of pieces
together and hit it with an airbrushed undercoat just to see how things
look.
Which was a great idea until I discovered my airbrush is still out of action
on account of a small accident involving white paint and a tank from the
year 40000, namely it's still clogged.
So instead I've opted for a GhoulWorks paint job which is what the name
states, paint by ghoul, by hand or in this case claw using a light coat of
Citadel Paint's Abaddon Black (Amazon link.)
And apart from looking like one of those rattle can paint jobs on an old
commodore, it's not too shabby for an undercoat. Great job you filthy
ghoul!
(Maybe we could share this idea with Haas Racing's Gunther Steiner who was
looking to save money just before he got Mick Schumacher and that other
rookie on board. I've saved thousands of dollars in possible paintwork fees
here!)
This was not what I had in mind you know..
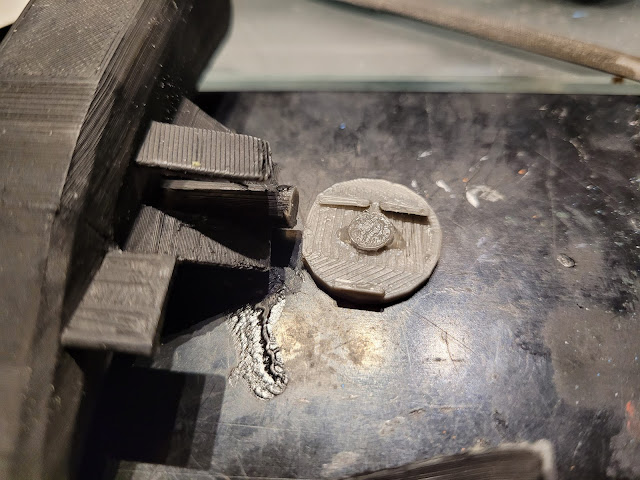
THE MISSING DISC BRAKE
Vital part missing? No problems, just print it out again! After using
Windows 3D builder to cut way enough of the front section to leave just the
disc setup behind, 12 minutes later I should have a serviceable rotor and
something to glue the front wheel too.
Well I would have if the first attempt didn't decided to stick to the hot
end..
Ugh. Luckily print number two stuck to the bed when I needed it to.
Unfortunately test fitting it shows up a couple of problems.
As it sits, the drive shaft needs to be filed flat otherwise
this brake setup will have far too much turn in and so will the wheel when
it's glued there (3 straight wheels and one turning in will look idiotic.)
Secondly, when the front body printed, it mangled up a bit of the upper and
lower supports. So there will be nothing but the shaft long enough to touch
the brakes.
So I can either extend the supports (somehow) and try to make it look the
same on the other side for symmetry reasons or have another go at printing
this with more material on it to cover all parts that I need.
Sigh, it's never easy this thing is it?
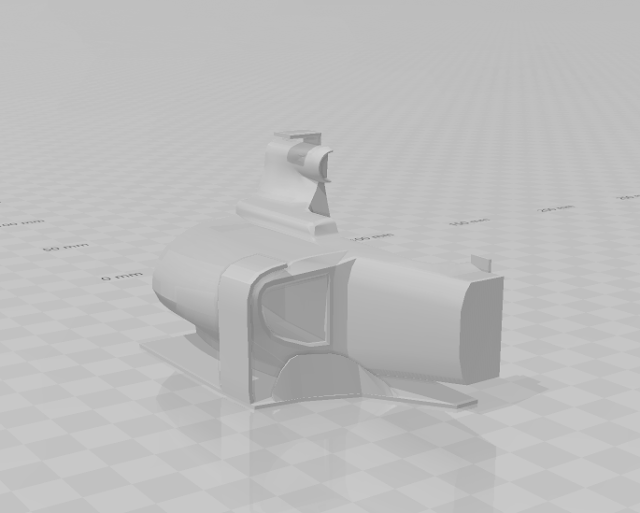
THE MAIN BODY
There's just one issue with the main canopy though but it certainly isn't
the design, that looks great:
It's more the massive amount of time it's going to take to produce. Because
as I've found out the wrong way many many many times now, the longer the
print, the more chances something goes horribly wrong. And given the
dimensions and shape, this one it's going to chew through a few hours..
But what if there was a way to take a chainsaw to it and print it in
sections...stay tuned!
Ahh but there is! Using Windows 3D Builder and the split tool, we can cut
our main body into four easy slices!
Which is genius! I'll just load them up into the print list and hope
like hell that they all come away without a hitch, ready to be joined up in
quarters like a real F1 car! (Don't quote me on that last fact.)
In fact printing the first quarter has worked...oh god you stupid printer,
what are you doing now??
Just a couple of layers in and this quarter is starting to peel like
an Aussie under the Balinese sun after three days.
Let's try that again shall we?
SUDDEN BREAKDOWN IN THE WORKSHOP
Can you print this for me? - Wife
Er no, it's out of action until I can figure out why. -Me
It turns out the way was a blockage in the bowden pipe (that's the white
hose looking thing in the picture) preventing any and all future material
from making it's way down the line, into the hot bits and squished onto the
plate. In terms of getting this little bastard piece out though, it was a
bit of an engine out job...
I spent a solid hour working on freeing that little blockage and was very
happy to see it fly off out of the end finally and land somewhere off in the
distance, hopefully never to block another pipe ever again. The good news
is, I did use the time to tighten a few things up which had come loose over
time so it wasn't all for nought,,
So we're working again! For how long though? Eh...next question!
THE MISSING DISC BRAKE - PART 2. AND 3
Part one was a good test, didn't work. Part two printed fine but in Gold
because now that I've fixed the machine for the nth time this month, Wife
wants to use Gold for her project. So I've just left it in there while
spitting out my new brake setup and boy does it look shiny!
(Let's be honest, I don't think any F1 car's support structure is made out
of gold but it'll be painted over so I don't think anyone will
notice..)
Unfortunately trying to cut it down enough to fit what was left turned out
to be massive pain in the toolkit and after a lot of dremel and filing
work...well nothing really lined up well. At all.
But this should have been so easy!
Which is why we're moving to part three of this very annoying missing
disc brake and that is printing the entire setup right back to the shell. I've
trimmed things right back for less chance of breaking and more chance of not
falling to pieces at the first hard corner, yay!
And I'm happy to report, this worked extremely well. Like a Rolling
Stones song we're going to paint it in brown sugar black
and send it, job's done here matey!
What do you reckon Carlos Sainz Jnr, just about ready to race now hey?
I don't think that's a wise idea, AT ALL.
Well worth asking the question I guess..
MAIN BODY - QUARTER ONE
After the recent unblocking disaster was averted, the printer has been on a
bit of a hot streak managing to print most things without failures (there's
still the occasional failure - like the wheel hubs which we'll get to in a
sec.) And I figured it was high time to get printing on the body. Well
the first quarter of it at least.
It grows!
And after removing a tonne of support material, I was very happy to see it
all come together so well. Just one teeny tiny thing I managed to overlook
in my zealous attempts to remove anything that wasn't supposed to be
there.
Namely, I managed to rip off the under tray without even noticing...oh
FFS...
Which is kind of important for the car to stay glued to the ground and
all that.
Luckily I'm getting very good at the split function of Windows 3D builder
and I've managed to isolate the floor. It'll only take 31 minutes to build
another one and hopefully I can find those curved sections to salvage in the
parts bin somewhere..
WHEEL HUBS
The good news is, I've found some wheel hubs to print. The bad news is, the
Ender 3 V2 cracks it if I try to print more than one at a time. When they go
right, they look like this:
Now if you're thinking 'Hey that's a very retro look' you're absolutely
right - these are R5 Turbo rims which I found right here on
Cults 3D which are perfect if you're building something like this: A Renault 5
Turbo out of 1980.
However my printer has spat it at the idea of having something
directly out of 1980 (year of my birth) on something that's supposed to be
the pride of 2016 and has managed to destroy every attempt to print more
than one at a time (I mean I do have 3 wheels still without covers, so..)
What the hell happened here???
MAIN BODY - QUARTER TWO
While I may have run out of episodes of Netflix's F1: Drive to Survive to
watch (and mother of god was that last episode of season 4 something
special!) I still have plenty of my own build to deal with, like the
remaining body sections and other bits and pieces I've missed. Or that have
snapped off at some stage.
Luckily most of quarter two came out relatively unscathed aside from the
brake assembly that broke (no pun intended there) as soon as the supports
came off. Also the undertray came out the density of a bubble gum wrapper
for some reason and flew off the body as soon as I sneezed...
So I glued it back in place and all was going well, right up until the point
when wifey noticed it and wondered if the flimsy sheet was something that
needed to be ripped off...which she tried to to until I stopped her in the
nick of time, explaining that no, that took quite some time to glue back
into place..
Keeping the project away from the delicate hands of wifey, I could finally
get a good idea on dimensions of this build from end to end.
Looking good so far! If Ant Man becomes President of Formula One anytime
soon, we might just be onto something here!
MAIN BODY - QUARTER THREE
Printed out on a different angle to the first quarter (which printed a good
half hour quicker but you can see by the print lines the difference...which
will hopefully disappear with many a coat of paint..) the under tray came
out much stronger as did pretty much everything else. Isn't it always the
way? You discover the best way to do things a good three quarters of the way
into a project..
I also printed out another section of under tray while I was at it for
section 1. And now with all going well, section 4 will finish off the
majority of the project in one big print.
Oh and I'm out of superglue.
Not to mention the fact that the printer is out of action again this week.
No no, not another break down, it's busy attempting to print a golden brain.
Yes we've got a trivia night that I'm hosting for the Eaglehawk Baseball
club and my wife decided she want to make a brain trophy for the occasion.
Only it hasn't worked yet.
Brain number 1 - fell to pieces when the printer decided to do it's own
thing.
Brain number 2 - filament jam when brain was at 73% done. Didn't have enough
supports internally to hold it well, so it crumbled.
Brain number 3 - Wouldn't stick to plate, aborted.
Brain number 4 - Stuck to the plate, filament jammed again.
Brain number 5 - Currently printing. 5th time's a charm yeah?
PAINTING TIME!
Yes it's been a while between updates and yes, it seems I've managed to miss
the update about the fourth quarter printing out. That and the last three
wheel covers. Long story short, it worked okay. It's not the
most...er...balanced....formula one car in existence now that it's
all glued together, but if you squint..
(Although I'm not exactly sure where I left the wing, that must be around
somewhere...)
Time to throw some paint on! Although I wasn't exactly sure what kind of
livery I really wanted (and still don't) what I did find however was my old
tin of Humbrol Metallic Blue. Maybe this will go okay? First things first
though, I needed to work out how much of the car was now going to be blue
and how much was going to be another colour (possibly gloss black).
Luckily the printed lines on this model make it very easy to mark where you
want one paint to end and the other to begin, so I just marked it with a few
scratches and off I went!
Having only painted anything with this particular shade of colour once
before, I had no idea how much it sparkles in the sun. And when you mix in a
little turpentine to get the old paint to flow a little easier, yeah I
quickly became a big fan of this choice. It needs a bit of a tidy up here
and there but I'm super happy with it so far!
The whistle song? What's it about? Read on! Controversial I know but I'm about to reveal the true meaning behind the Whistle song by Flo Rida. Why? Because I'm getting the general feeling that people around me are really missing the true spirit of Mr Rida's epic masterpiece... We're getting right into the real Flo, yo. After all this time, it's still all about that wisal baby song!
Early 2018 and according to Aussie gaming magazine Hyper, there are apparently 200 games I must play. No exceptions. I mean that's what the front cover screamed at me when I walked past the stand in the library earlier today. It doesn't look like it's giving me much of a choice here. But as much as I enjoy the occasional game of Super Monaco GP and Commander Keen, I have a sneaky suspicion that at best that without reading the full list, I've probably played a quarter. Possibly less - undoubtedly the list of games I have played will be far shorter than the have not. But there's only one way to find out..
It's been a while between scam emails - life has been life, work has been hectic, I've been grunting and sweating my way through my exercise sessions and so I've been putting responding to random idiots through my email on the back burner. Until today when I was kindly asked not to 'ignore this massage.' I hope it's a hot stone one! Trust me, I NEVER ignore a massage. Better set the record straight then...


Comments
Post a Comment